
SUPNOVA Battery Capacity Voltage Indicator Level– DC 8V to 100V LCD Voltmeter Gauge for 12V 24V 48V 60V 72V 84V Lead Acid, Lithium, LiFePO4
Specification:Brand: SUPNOVAVoltage Range: DC 8V to 100VBattery Types: Lead Acid, Lithium-ion, LiFePO4Display: LCD with voltage (V), battery % and colored bar graphColor Display: Red + Green + Blue segmentsFeatures: SET button for battery type selection, Power ON/OFF buttonAccuracy: ±1%Case Material: ABS plasticDimensions: Approx. 60mm x 33mm x 12mmWeight: Approx. 25gDescription: This SUPNOVA digital battery capacity indicator is a smart voltmeter gauge that shows real-time voltage and battery percentage with an intuitive color bar display. Compatible with 12V to 84V battery systems including Lead Acid, Lithium-ion, and LiFePO4, it is ideal for e-bikes, solar systems, motorcycles, and electric scooters. The SET button allows switching between battery types, and the compact LCD panel makes it suitable for dashboard or panel mounting.Application:Electric bikes and scootersSolar battery banksCar and motorcycle battery monitoringElectric wheelchairs and cartsDIY battery-powered projectsHow to Set Battery Type on SUPNOVA Battery Capacity Indicator:Turn on the device. Press the Power button if the display is off.Enter Setting Mode: Press and hold the SET button for 3–5 seconds until the battery type code appears and starts flashing.Choose Battery Type (P-code): Use short presses on the SET button to cycle through the following battery types:P01 – 3S Lithium-ion BatteryP02 – 4S Lithium-ionP03 – 5S Lithium-ionP04 – 6S Lithium-ionP10 – 12V Lead-Acid (or Gel) BatteryP20 – 24V Lead-Acid (or Gel) BatteryP30 – 36V Lead-Acid (or Gel) BatteryP40 – 48V Lead-Acid (or Gel) BatteryP60 – 60V Lead-Acid (or Gel) BatteryP72 – 72V Lead-Acid (or Gel) BatteryP0 – Custom voltage mode (manual min/max voltage setting)Confirm the Selection: Press and hold the SET button again for 3–5 seconds to save and exit setting mode.Done! The display will now reflect accurate battery percentage and voltage for the selected battery type.
Goo Gadget
All products

Specification:
- Brand: SUPNOVA
- Voltage Range: DC 8V to 100V
- Battery Types: Lead Acid, Lithium-ion, LiFePO4
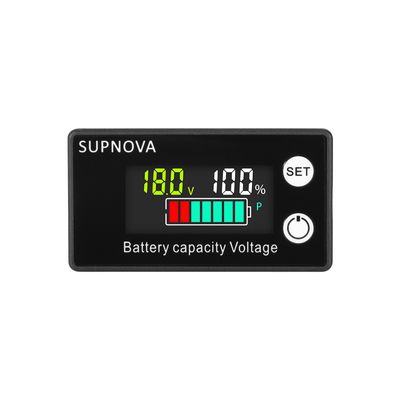
- Display: LCD with voltage (V), battery % and colored bar graph
- Color Display: Red + Green + Blue segments
- Features: SET button for battery type selection, Power ON/OFF button
- Accuracy: ±1%
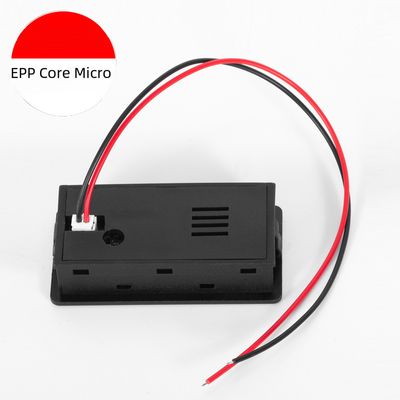
- Case Material: ABS plastic
- Dimensions: Approx. 60mm x 33mm x 12mm
- Weight: Approx. 25g
Description:
This SUPNOVA digital battery capacity indicator is a smart voltmeter gauge that shows real-time voltage and battery percentage with an intuitive color bar display. Compatible with 12V to 84V battery systems including Lead Acid, Lithium-ion, and LiFePO4, it is ideal for e-bikes, solar systems, motorcycles, and electric scooters. The SET button allows switching between battery types, and the compact LCD panel makes it suitable for dashboard or panel mounting.
Application:
- Electric bikes and scooters
- Solar battery banks
- Car and motorcycle battery monitoring
- Electric wheelchairs and carts
- DIY battery-powered projects
How to Set Battery Type on SUPNOVA Battery Capacity Indicator:
- Turn on the device.
- Press the Power button if the display is off.
- Enter Setting Mode:
- Press and hold the SET button for 3–5 seconds until the battery type code appears and starts flashing.
- Choose Battery Type (P-code):
- Use short presses on the SET button to cycle through the following battery types:
P01– 3S Lithium-ion BatteryP02– 4S Lithium-ionP03– 5S Lithium-ionP04– 6S Lithium-ionP10– 12V Lead-Acid (or Gel) BatteryP20– 24V Lead-Acid (or Gel) BatteryP30– 36V Lead-Acid (or Gel) BatteryP40– 48V Lead-Acid (or Gel) BatteryP60– 60V Lead-Acid (or Gel) BatteryP72– 72V Lead-Acid (or Gel) BatteryP0– Custom voltage mode (manual min/max voltage setting)- Confirm the Selection:
- Press and hold the SET button again for 3–5 seconds to save and exit setting mode.
- Done! The display will now reflect accurate battery percentage and voltage for the selected battery type.
SUPNOVA Battery Capacity Voltage Indicator Level– DC 8V to 100V LCD Voltmeter Gauge for 12V 24V 48V 60V 72V 84V Lead Acid, Lithium, LiFePO4
Specification:
- Brand: SUPNOVA
- Voltage Range: DC 8V to 100V
- Battery Types: Lead Acid, Lithium-ion, LiFePO4
- Display: LCD with voltage (V), battery % and colored bar graph
- Color Display: Red + Green + Blue segments
- Features: SET button for battery type selection, Power ON/OFF button
- Accuracy: ±1%
- Case Material: ABS plastic
- Dimensions: Approx. 60mm x 33mm x 12mm
- Weight: Approx. 25g
Description:
This SUPNOVA digital battery capacity indicator is a smart voltmeter gauge that shows real-time voltage and battery percentage with an intuitive color bar display. Compatible with 12V to 84V battery systems including Lead Acid, Lithium-ion, and LiFePO4, it is ideal for e-bikes, solar systems, motorcycles, and electric scooters. The SET button allows switching between battery types, and the compact LCD panel makes it suitable for dashboard or panel mounting.
Application:
- Electric bikes and scooters
- Solar battery banks
- Car and motorcycle battery monitoring
- Electric wheelchairs and carts
- DIY battery-powered projects
How to Set Battery Type on SUPNOVA Battery Capacity Indicator:
- Turn on the device.
- Press the Power button if the display is off.
- Enter Setting Mode:
- Press and hold the SET button for 3–5 seconds until the battery type code appears and starts flashing.
- Choose Battery Type (P-code):
- Use short presses on the SET button to cycle through the following battery types:
P01– 3S Lithium-ion BatteryP02– 4S Lithium-ionP03– 5S Lithium-ionP04– 6S Lithium-ionP10– 12V Lead-Acid (or Gel) BatteryP20– 24V Lead-Acid (or Gel) BatteryP30– 36V Lead-Acid (or Gel) BatteryP40– 48V Lead-Acid (or Gel) BatteryP60– 60V Lead-Acid (or Gel) BatteryP72– 72V Lead-Acid (or Gel) BatteryP0– Custom voltage mode (manual min/max voltage setting)- Confirm the Selection:
- Press and hold the SET button again for 3–5 seconds to save and exit setting mode.
- Done! The display will now reflect accurate battery percentage and voltage for the selected battery type.
Hello! 👋🏼 What can we do for you?
19:39